Do you need to know how to make a too big ring fit? Maybe, like me, you accidentally ordered the wrong size of ring, or maybe you've lost weight, want to wear a loved one's ring for a special occasion, or perhaps your rings are just too big in winter.
No matter why you need to make your ring smaller at home, this post can help you! Today I'm sharing how to make a ring smaller at home with nail polish.
For years, I've periodically applied food-grade silicone to the inside of my ring to make it smaller. This post on how to "resize" your ring at home has been incredibly popular for years!
I don't have any complaints about this method, but I know sometimes people need to make their ring smaller fast (to wear a special piece to a party, for example). This is a technique you can use right now so you can get your ring fitting again in a hurry!
There are also some pros and cons for both methods of making your ring smaller at home. Make sure to check out the list so you can pick the way that's best for you!
This post may include affiliate links, which means I may make a commission on purchases made through these links at no additional cost to you.
What you need to resize your ring with nail polish
You don't need much to "resize" your ring with nail polish. You'll need:
- Your ring!
- Clear nail polish
- Rubbing alcohol and a cotton ball, piece of paper towel, etc.
- A piece of tape. I used painters tape.
Please consider using a non-toxic nail polish.
You know how nail polish stinks? That's because it's full of potentially toxic chemicals! Although it's better now that it was in the past, many nail polishes still contain harmful chemicals and they can leach into your body.
Personally, I plan to never use a 'normal' nail polish again after reading up on nail polish exposure when I was pregnant.
If you resize your ring with nail polish, you'll be putting it in direct contact with your skin, potentially for a long period of time if you resize your wedding/engagement rings like I do. That's why it's incredibly important to use a non-toxic nail polish to make your ring smaller.


If you want to know how safe your nail polish is, check out the Environmental Working Group nail polish safety database.
How to make your ring smaller with nail polish
Clean your ring thoroughly with rubbing alcohol. This step is very important! Focus on the interior back and sides and try to avoid the setting (especially if it's a pearl ring! Pearls are fairly easy to damage).
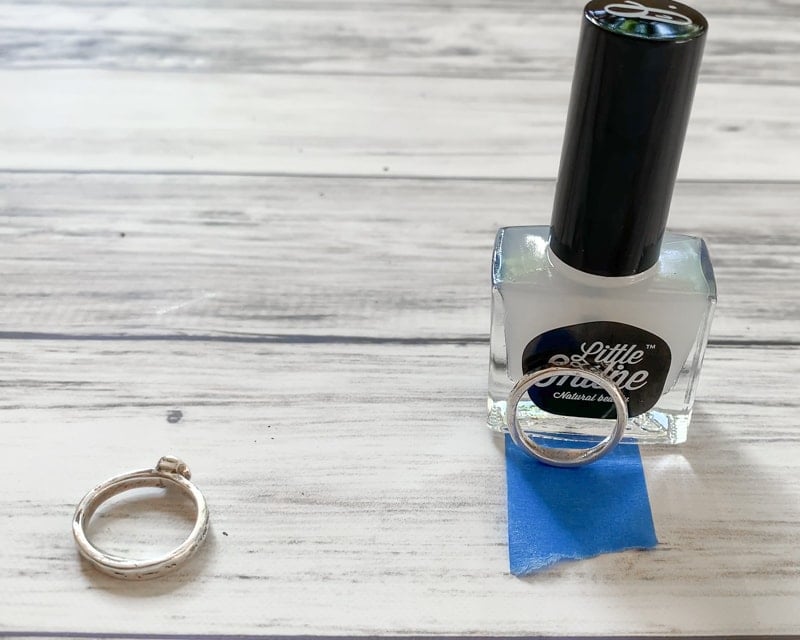
Prepare a piece of tape. Just an inch or so is fine.
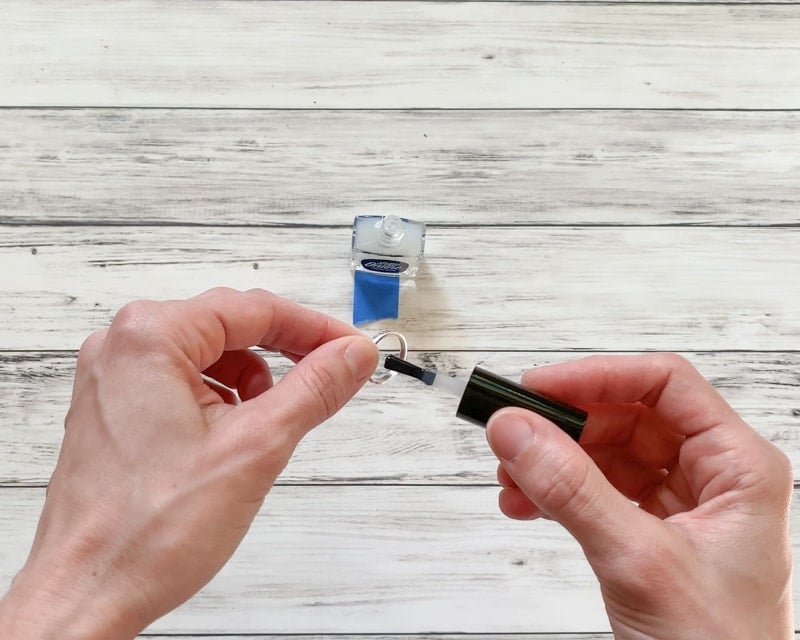
Apply a coat of nail polish to the inside of your ring, focusing on the back with a little coming up the sides. Don't apply the polish all the way around or it will sit oddly and look strange when you wear it!
Set the nail polish bottle down on one end of your tape, as shown. Lean your ring up against the bottle as vertically as possible. The tape will help it stay in place. If you plop your ring down on its side, the nail polish can run off while it's still wet!
Wait for the polish to dry, then apply two or three more coats, if needed. Make sure to test the fit between coats!
Video tutorial showing you how to make your ring smaller at home
If you're unsure about the steps, please check out this quick video tutorial showing you how to use nail polish to make your ring smaller!
I was so excited to share this quick way to make your ring smaller with a couple we recently photographed to celebrate their engagement. She was worried that her ring would slip off cold winter fingers while walking their dog, but now she's good to go until summer!
I explained to her that when warmer months hit, she can just remove the nail polish until next winter comes.

Pros and cons of making your ring smaller with nail polish vs silicone
As I wrote above, I've resized my rings using clear, food-grade silicone for years. Both methods have their advantages and disadvantages. Here are some of the pros and cons of each method to help you decide which is right for you!
Pros of using nail polish to make your ring smaller
- It's quick. Even if you need several coats, you can make your ring smaller in an hour or two, which is great if you want to wear a special ring out for a last minute event.
- You probably already have nail polish at home.
- It's nice and smooth, so it feels more 'natural' on the inside of your ring.
Cons of using nail polish
- Nail polish may be toxic, especially if you don't get non-toxic nail polish.
- If you don't use peel-off water-based nail polish, you may accidentally damage any fake gems or pearls when you use nail polish remover.
Pros of using silicone to resize your ring
- Food grade silicone is cheaper than non-toxic nail polish (Actually, it's cheaper than most 'nicer' brands of nail polish in general).
- Food grade silicone is a lot less likely to leak toxins into your body!
- You don't need to use harsh nail polish removers - it peels off without leaving a residue.
Cons of using silicone
- It dries kind of cloudy, not crystal clear.
- It is slightly tacky, not super smooth.
- You need to wait at least overnight, preferably 24 hours, for it to fully cure.
- Using some lotions, perfumes, or sunscreens may make it come off more quickly. (Though this can be the case for some water-based nail polishes, too.)
I really hope that this tutorial on how to make your a smaller with nail polish helps you out!
In case you've missed the links on resizing your ring at home with silicone, you can see that post right here:

What ring are you going to resize and wear out?

More Related Posts
[pt_view id=“15d429e15n"]
[catlist search="tutorial" numberposts=4 orderby=rand excludeposts=this]


Barb
You have great ideas and you write excellent professional tutorials! My only problem was that I could not get the video tutorial. I look forward to seeing more of your ideas. Thanks!
Natasha
I'm sorry the video wouldn't play for you - I don't know why that happened! I just checked at it's working for me on my computer and phone. Maybe there was a temporary glitch?