This post may include affiliate links, which means I may make a commission on purchases made through these links at no additional cost to you.
Remember that pretty paper flower garland tutorial from a few weeks ago? Today I'm going to show you how to make your own bamboo wedding arch to hold all that garland and transform it into a beautiful backdrop for your wedding ceremony or photo booth. It cost less than $50 and an hour of active involvement to make, which I think is pretty good since bamboo wedding arches typically cost a couple hundred dollars to buy and aren't as easy to set up virtually anywhere!
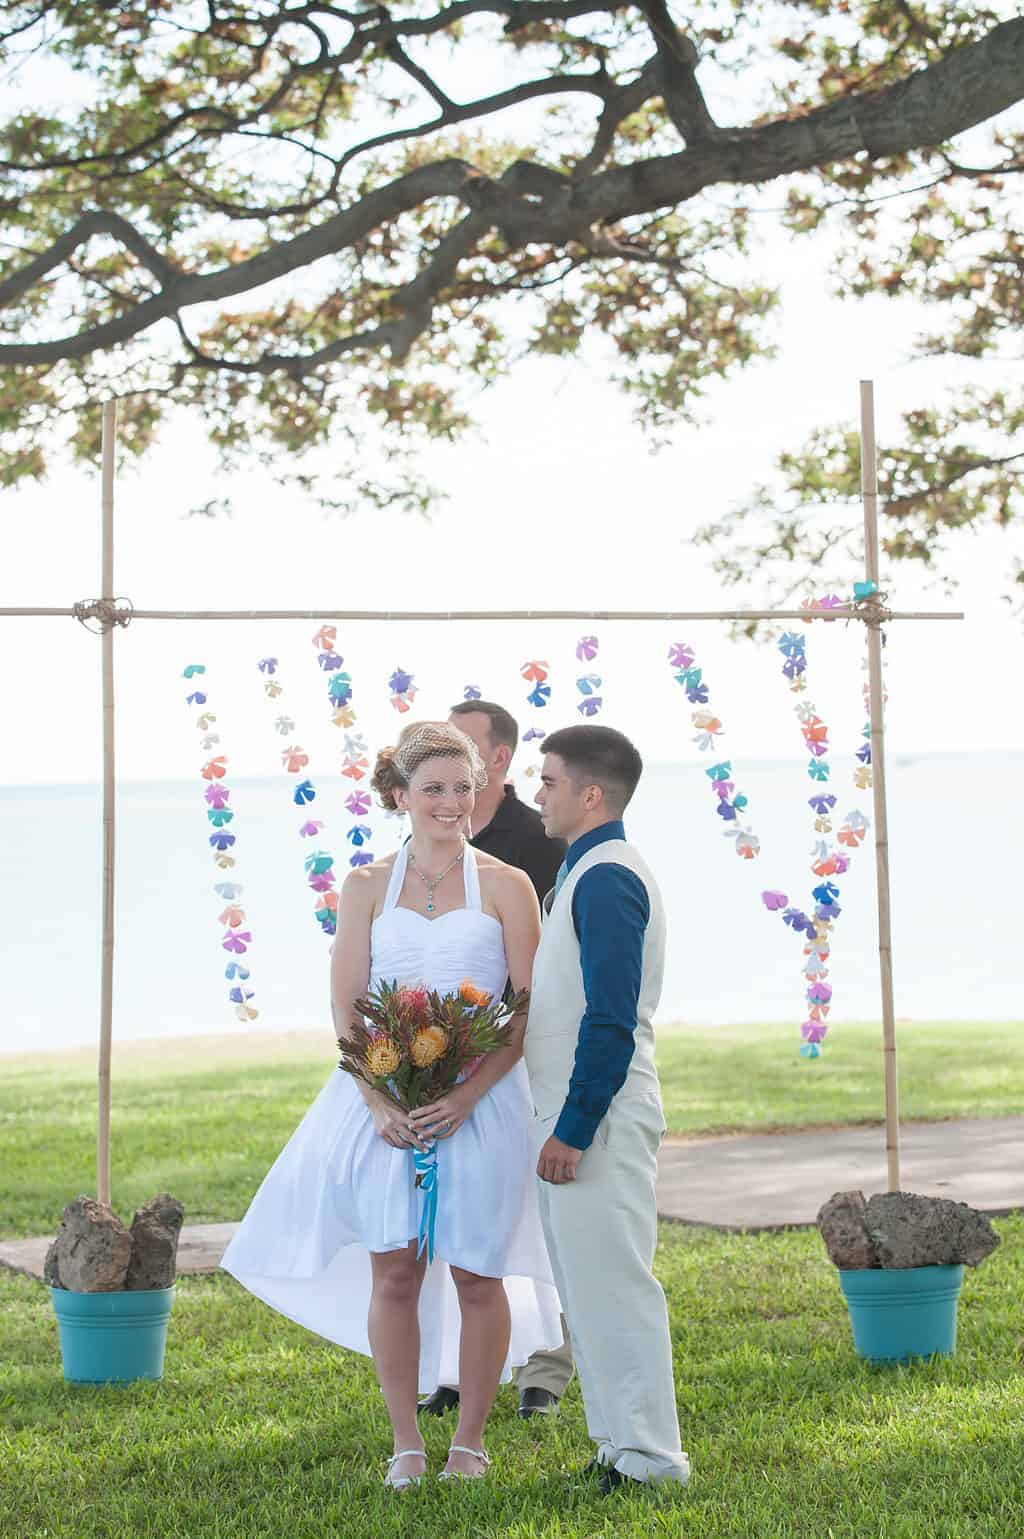
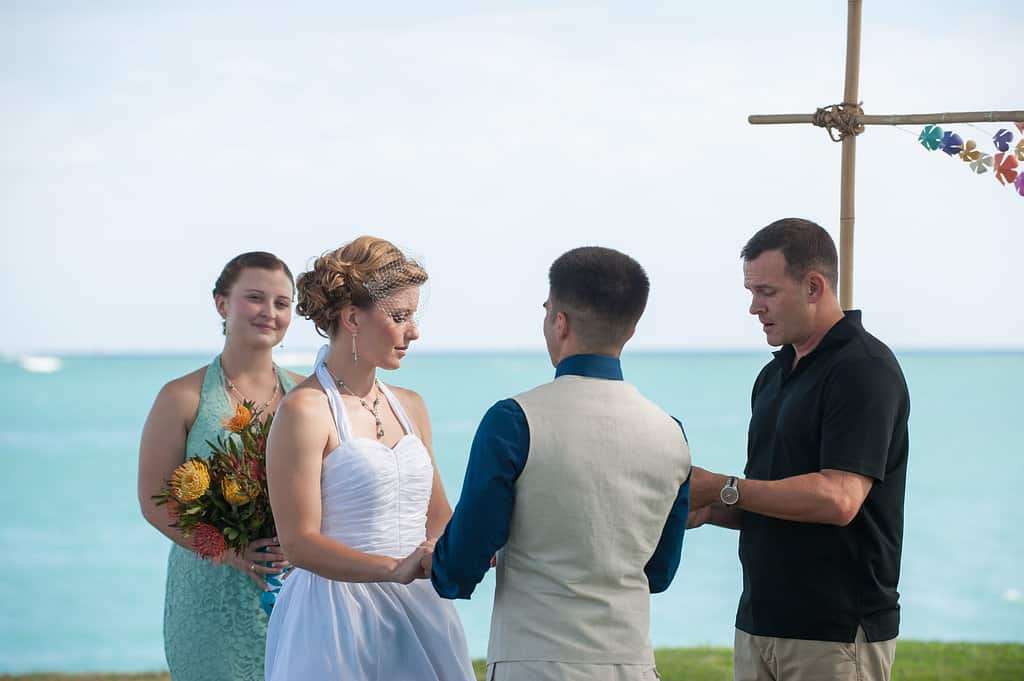
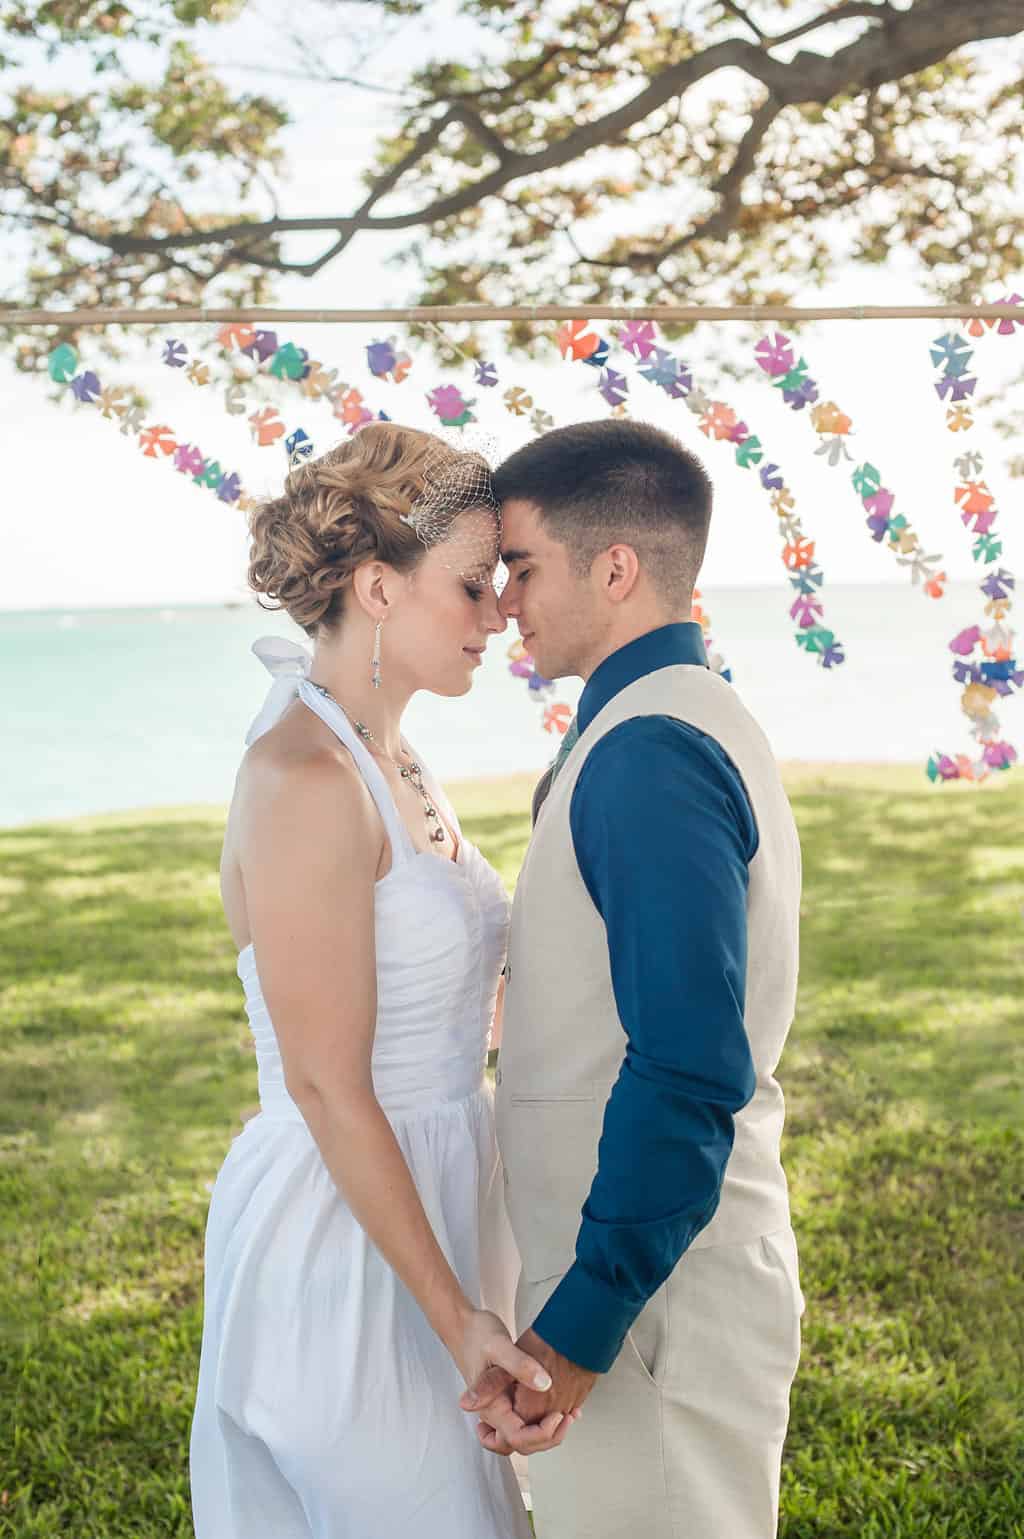 You can obviously use this portable arch with whatever garland or backdrop you want to use, but I absolutely love the way all our colorful paper flowers looked at our outdoor wedding in Hawaii. As you can tell from the angle of the flowers, it was really, really windy that day. Like 30-40 knot winds variety of really windy. Winds are one of the (many) reasons I'd always sworn I would absolutely never get married outdoors. I guess they say "never say never" for a reason! But, anyway, it was very windy on our wedding day, which is the reason you see some broken concrete slabs sticking out of the flower pots in the photo below. Each flower pot actually had 25 pounds of Quikrete cement in it, which is more than adequate for holding the arch up on a normal day. Because the arch blew over shortly before the ceremony, my enterprising cousins found a way to weight the pots down a little more. Don't get married in a gale and you won't have the same problem!
Materials for a DIY bamboo wedding arch
- Three 8 foot sections of bamboo - the two support pieces should be at least 1.5" thick, the top piece can be 1"
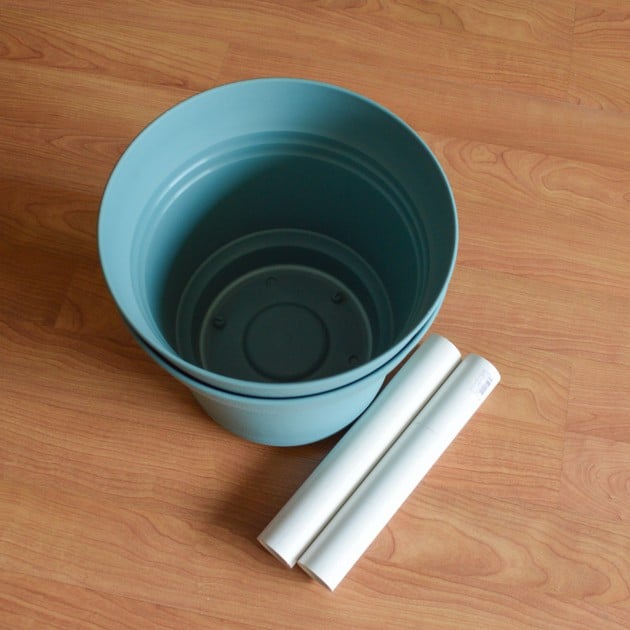
- Two large flower pots or buckets - I recommend using something at least 10-12" tall
- Two feet of PVC pipe - please see the note below
- A hack saw or hand saw for trimming the PVC pipe - I used an inexpensive miter box and the saw that came with it
- A long ruler - I used an 18" quilting ruler
- A permanent marker
- Some Duck Tape or masking tape
- A 50 pound sack of Quikrete, or other ready to mix with water concrete
- A trowel, shovel, or something else to mix the Quikrete with (you can actually wash it clean so your trowel shouldn't be ruined)
- A spare utility bucket for mixing the Quikrete (optional, also washable)
- A level - I took the end of an adjustable square/level
- A package of rope for assembling the arch - I bought a 25' package of ¼" manila
*Note on the PVC pipe* I was able to pick up the bamboo and PVC pipe at the same local store. I found the bamboo I wanted, then walked it over to the PVC pipe section. They had 12" sections of pre-cut pipe available, so I simply tried a few on the bamboo until I found a good size. You don't want to have to force the bamboo, but you also don't want the fit to so loose that the bamboo rattles around inside the pipe. When you're test fitting, don't forget that, because of how bamboo grows, one end each bamboo pieces is probably thicker than the other end. The thicker end of each bamboo support piece needs to become the bottom, so make sure the PVC pipe fits over this thicker end.
A lot of the large planers and decorative buckets I saw were shopping around either were nothing like what I wanted or very expensive. I used the turquoise planters shown in the Amazon widget below and was very happy with them. They were large, inexpensive, shipped free with my Prime membership, and didn't fall apart under the weight of 25 pounds of cement (or the added slabs on top!). This planter also comes in 14 different colors! If you can't find something particularly attractive, you could always use a pair of those 5 gallon utility buckets you can find at home improvement stores and then simply disguise them with some fabric and a big bow.
How to make your own bamboo wedding arch
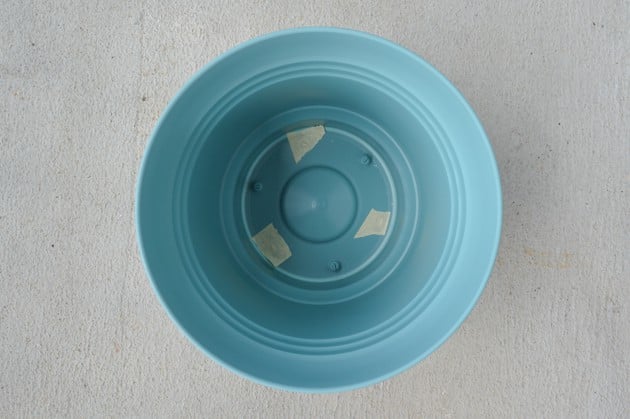
1. First, the PVC pipe needs to be cut down to size. I bought 12" sections of pipe, but my planters were just over 10" tall and I didn't want the pipe to show. The easiest way to figure out where to cut your pipe is by putting it in the middle of the planter, placing your long ruler (or something else flat, straight, and rigid) across the planter's top, and then making a mark where your ruler touches the PVC pipe. Just check out the picture below. =)
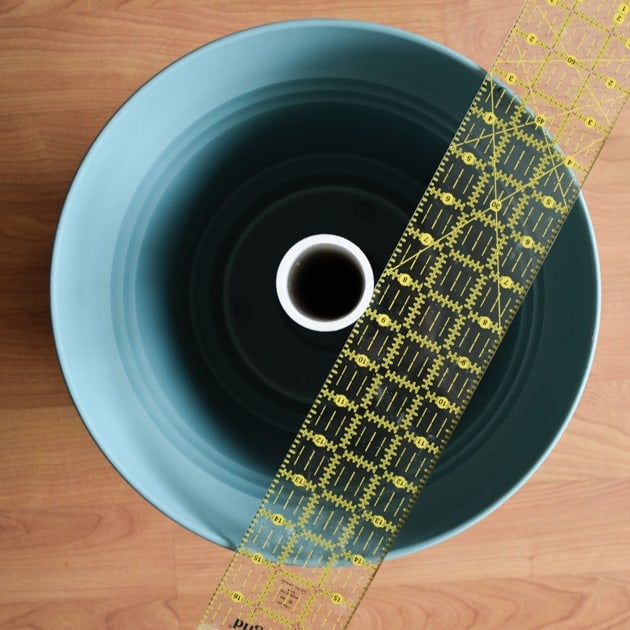
2. Cut your pipe pieces to length. To make sure they don't stick up out of the planters, make your cut just to the "inside" of your marking line. Try to keep the cut as level as possible - this will be important in step 6! I highly recommend using an inexpensive miter box and the saw that comes with it because you'll get a clean, straight cut.
3. You're almost ready to mix up the Quikrete! Before you do that, though, it's a good idea to cover any holes in your planter with pieces of masking tape or Duck Tape. It's also a good idea to move the project outdoors at this point! Unless, of course, you want cement on your living room floor.
4. Mix your Quikrete according to directions. This is easiest to do in a separate bucket, but you can use one of the planters if you have to.
5. Place a piece of PVC pipe in the center of a planter and hold it in place while transferring about half the mixed Quikrete into the planter. Try to fill the planter as evenly as possible.
6. Place your level on top of the PVC pipe that's sticking out of the Quikrete and reposition it as needed until the top is level. Gently reposition/pack down the Quikrete, as needed, to ensure the pipe stays in the correct place.
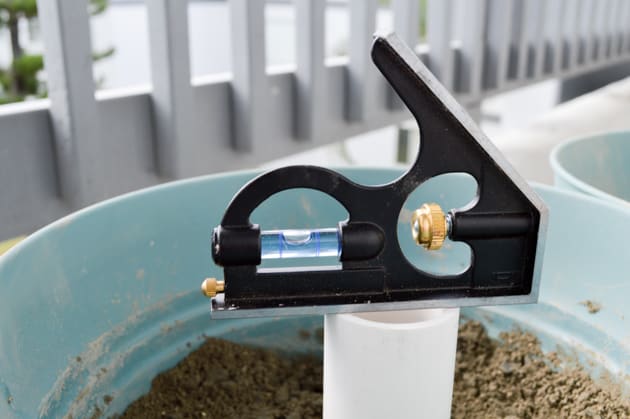
7. Repeat steps 5 and 6 with the second planter and then allow the Quikrete to cure (check your particular package for instructions - different formulas have different procedures!). Clean up your trowel, hands, etc. immediately and the cement will wash off. This is also the time to clean up any messes (like the one you see along the inside of the planter pictured above).
You'll need help from at least one other person when you're ready to set up the arch. I'm really sorry there aren't photos showing this process, but we were pretty busy getting everything ready at the ceremony site! All you need to do is tie the top pole to the two support poles and then set them in the prepared planter/PVC pipe bases. You'll want about a foot of bamboo sticking out on either end of the top pole and about a foot sticking out above it, as well. This makes the arch more stable and more attractive. I set the two base planters about six feet apart, placed the support poles on the ground so they'd be easy to place in the pipe holders, and then lashed the top pole in place. Then we tied/taped the garland strands in place and recruited a couple more people to help raise the arch up and set it down in the prepared bases. You can kind of see how I lashed the bamboo together in the top right of the photo below, and there's a great step by step tutorial on how to lash two poles together at Grog's Animated Knots.
I intended to fill the remaining space in each planter with extra paper blossoms, but the wind clearly made that impossible! I think it would have looked nice, though, and it would be an easy way to hide the cement.
Unlike many bamboo arches that you have to sink into the sand, this arch is totally freestanding and can be used even when you can't dig holes. It's portable, sets up quickly, and easy to customize. In other words - it rocks! Having a backdrop to our wedding made for some fantastic photos, so I'm thinking this would be a great photo booth accessory, too.
Did you have/are you planning an outdoor wedding? Did you set up a backdrop for your event?
More Related Posts
[pt_view id=“15d429e15n"]
[catlist search="tutorial" numberposts=4 orderby=rand excludeposts=this]
LeAnn
You are so clever! Love that first photo of you and Angel -- and the pretty and colorful backdrop.
Natashalh
Thank you!It's one of my favorite photos. =)
Paige @ Little Nostalgia
I can't believe it still blew over with all of the Quickrete in there! That's some serious wind, haha.
This is so cute, and I love that you can use it again for other things. It looked great in your pictures! 🙂
Natashalh
Yeah, it was pretty ridiculously windy. There was actually a tropical storm moving in, but it didn't dump rain until that night. It wasn't the prettiest solution, but I'm really glad my cousin and her husband found those chunks of cement to stack on top.